How to Test Page Titles and Meta Descriptions for SEO
- Nick Eubanks
- Apr 10, 2019
- 8 min read
Updated: Apr 3
Scaled across thousands of pages on an enterprise site, that small change = millions of visits.
The difference between position 1 and 2 (or even 6 and 3) can be attributed to user engagement metrics like CTR. The fastest way to manipulate CTR is through changes in page titles and meta descriptions.
Changing your titles and metas are easy - it's SEO 101. However, tracking these changes (across 1000s of pages) is a challenge.
The file is built to evaluate:
The (+ / -) of keyword rankings when you change page titles or meta descriptions
The (+ / -) of Click Through Rate (CTR) when you change page titles or meta descriptions
Use Cases for The Report
This report is best used for to measure mass amounts of changes in bulk on large, enterprise websites. In particular, websites with a large number of pages that you can group together.
For example:
Ecommerce product pages
Ecommerce category pages
“Location” pages for national franchises
Directory pages / listings
It operates by pulling in data from Google Search Console to measure the impact of rankings / SERP CTR over periods of time.
In order to get the most out of this report, you’ll need to use proper testing techniques by setting a hypothesis, control and test.
Let’s look at some potential examples...
Example 1 - Ecommerce Site
Let’s imagine we’re working with a health / supplement brand like GNC.
Hypothesis. Adding “FREE Shipping today only” into the meta description will increase CTR of keywords ranking between position 2 and 6.
Test. Change 50% of meta descriptions to include the words FREE Shipping at the end.
Control. Leave 50% of meta descriptions as is, ensuring that the rest of the naming nomenclature is consistent
Measure. Use the report to measure the ranking changes and CTR changes of the test and control pages over a 3 month period, pulling the data every 15 days (6 reporting periods)
Example 2 - National Franchise
Let’s imagine we’re working with a national gym like 24 hour fitness.
Hypothesis. Adding zip code to page titles will increase keyword rankings in that local market.
Test. Change 50% of page titles to include the zip code in the page title.
Control. Leave 50% of page titles as is, ensuring that the rest of the naming nomenclature is consistent.
Measure. Use the report to measure the ranking changes and CTR changes of the test and control pages over a 3 month period, pulling the data every 15 days (6 reporting periods)
Again, this works best on larger websites where you can dynamically make mass changes to templates (page titles and metas) to measure the impact on a large scale. While you can use this on any site, the data will likely be inconsistent due to the lack of volume.
Running the Report
We hacked together a Google Sheets file that does all the legwork for you. The instructions below will run you through tab by tab how to build the report.
On-page Variation
Implementation Review
Results Data
Test + Control Analysis
Test vs. Control Analysis
We’ll go over the detailed step by step process you should follow to build each of these sheets.
On-Page Variation tab
We recommend to group the pages you want to test by page-type (product pages, location pages, etc) before start running the report. This way you’ll obtain more consistent results.
For the purpose of this demonstration, we'll be testing the location pages of a national franchise.
Pulling current titles and metadata
Manually upload your target pages into a crawler (we like Screaming Frog) to pull current titles and meta descriptions.
Export your data as .csv
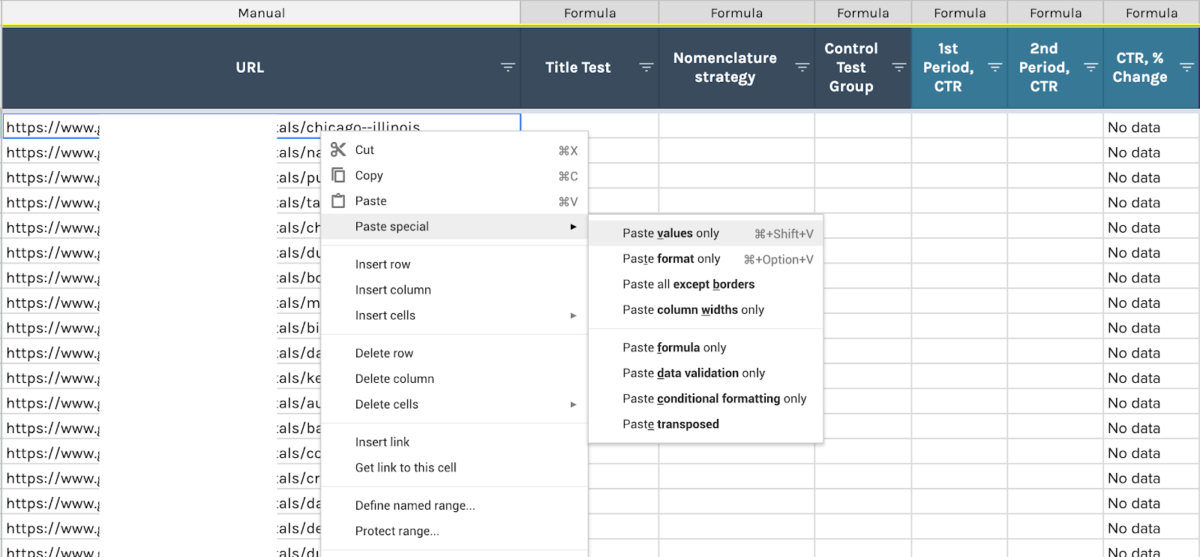
Copy the exported .csv sheet (all cells) and paste it as values only into the _screaming frog crawl_1 tab (make sure to paste the data starting on cell A1, if not the formulas behind these tab will not run properly).
By doing this, the On-page strategy tab will be populated with the corresponded target urls, titletags and meta descriptions.
Make sure that all your columns are being filled with data by expanding the formula down.
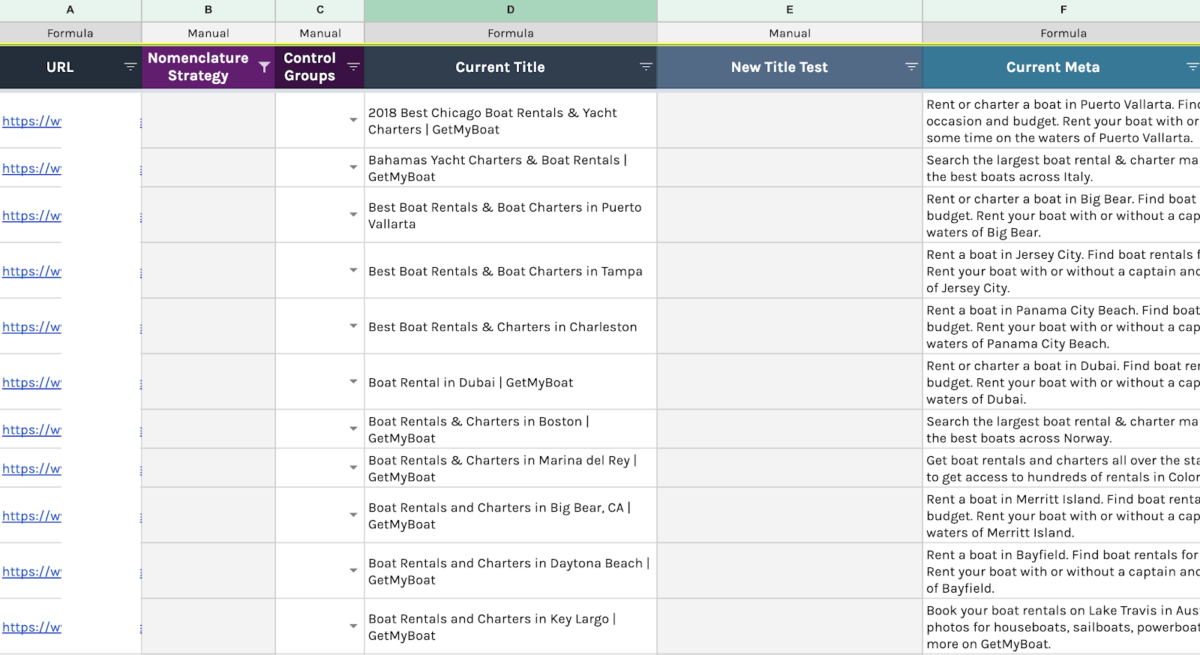
Your On-page Variations tab should look like this:

2. Developing Nomenclature Strategies (aka the hypothesis)
Now we’re ready to define the "Nomenclature Strategies", aka the variances we’ll use to test new titles and metas.
We came up with 3 different Nomenclatures to test page titles.
Strategy 1 = 20 - 100+
Strategy 2 = Location Name
Strategy 3 = Top
Each of these would be tacked on to the beginning of the page's existing title.
Strategy 1: 20 - 100+
Hypothesis - adding a “number between 20 and 100” & “+” at the beginning of the title will increase CTR and page rankings on that specific page.
Test - change 50% of page titles to include the strategy 1
Control - leave 50% of page titles as is, ensuring that the rest of the naming nomenclature is consistent
Fill out column B, D and Fwith your nomenclature strategies, new titles and new meta description correspondingly.
3. Defining “Control-Test” groups
After you get all your metadata written, it’s time to get your control groups setup. We created 2 categories to easily manage this distinction:
Test: these pages are the ones we're updating.
Control: these pages will remain as is.
Evaluate how many pages you actually have per “nomenclature strategy” and divide each group in two. Assign “Control” to 50% of the pages and a “Test” to the rest 50%.
Example:
# Pages on Strategy 1 = 18 pages = 9 control + 9 test.
# Pages on Strategy 2 = 18 pages = 9 control + 9 test.
# Pages on Strategy 3 = 8 pages = 4 control + 4 test.
In other words, you'll be only changing titles and meta descriptions on half of your pages. The rest of the pages will remain as is.
Your sheet should be looking like this:

4. Implementation Review tab (optional)
Since clients’ in-house SEO teams or devs are usually the ones updating pages, it’s always best practice to verify that all your recommendations were properly implemented.
To make this process easier, we created a sheet called “Implementation Review” which, based on custom build formulas, will do this verification for you.
Note: If are you are 100% sure all changes has been implemented on Test pages, then you can skip this step and hide this tab. If not, follow the following steps.
Pulling most recent metadata
Manually crawl your pages as a list on Screaming Frog
Export the file as .csv
Copy/paste all data into the following tab: _screaming frog crawl_2
This new data will populate the Implementation review tab automatically. The formulas on the Title implemented on site? columns will “verify” if changes were implemented by comparing current vs. recommended titles and finding a match.
These columns will display:
YES if the changes were positively implemented on the page.
And NO if the changes have not been implemented yet.
Note: you’ll need to expand down the formula on these columns in order to activate all cells with the formula.
Now we’ll filter the data as follows in order to report on important pages only.
Filter column B (Control Groups) by Test only.
Filter columna E (Title implemented on site) by “No”
Overwrite cells on column E with “No Yet”
Filter column E by “Yes” and “No”
Unfilter column B so you get both Control and Test pages.
Copy the filtered URLs on column A and Paste as VALUES ONLY on cell A3 of the Results Data sheet.
5. Results Data tab
Once you verify that all the metadata recommendations were successfully implemented, you can start running the actual report by analyzing the performance breakdown of the pages that were changed.
We recommend to wait until you have a full 3 months since making the changes before running this report.
Important Note: if you skip the “Implementation Review” step, then you need to:
copy all the URLs on On Page Variation tab and
paste them as VALUES ONLY on cell A3 of the Results Data tab.

Identifying Date Windows for Analysis
The identification of your date periods for analysis will depend on your business sales activity; is it seasonal, cyclical, or neutral?
In this specific case we were working with a seasonal client, which is why we decide that our reporting will be done year over year (Y/Y).
Ex. Report Y/Y:
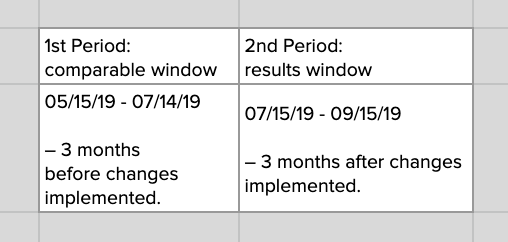
If the changes were implemented on July 1st, set your results window (period after the changes were made)to be from July 15th (we usually give a 10-15 days window for Google to digest and index the new page changes) to Sep 15th 2019.
Then, your comparable window (time before changes were made) should be the same dates but from the past year: July 15th - Sep 15th 2018.

Ex. Reporting Period over Period OR Before/After:
If you were working with a neutral client (sales do not depend on seasons or specific sale cycle) you could easily just compare the performance of your pages on a before and after basis depending on when the changes were made.

For this part of the process we’ll be working with a reporting automation plugin for Google Sheets called Supermetrics. It will really make your life easier if you get access to it, however, in case you don’t, you can still download the data manually from Google Search Console and follow the same format below.
Setting up _GSC Data sheets
You’ll find two empty data resource sheets called:
_GSC data 1: this sheet will have the data from your comparable window.
_GSC data 2: this sheet will have the data from yourresults window.
These tabs will follow the same process of creation, the only variation between them is the date window selection.
Click on cell A1 of _GSC Data 1
Launch Supermetrics sidebar: top menu > add-ons > supermetrics > launch sidebar.
Make sure all Supermetrics settings are set as follow:
Data Source: Google Search Console
Sites: client site
Dates: 1st period (comparable)
Metrics: CTR% and Avg. Position
Split by: Full URL
Filter: Clicks greater than 1
Click Get Data to Table.
After a few minutes (depending on the amount of data), your sheet should look like this:

Repeat this same process for _GSC data 2 but make sure to change the Date Selection with your RESULTS (AFTER) window dates.
Once your fill out both data resource sheets, your Results tab should be automatically populated.
% Changecolumns (column H and K). These columns have a custom build formula that compares 1st and 2nd period results on CTR and Avr. Position per each page. The color scale on each of these columns represents the positive (green) or negative (red) performance of a page.
Note: formulas are placed at the first cell of each column (H3 and K3). Make sure you DO NOT delete these formulas. Without them you’ll only have empty columns.
Results Analysis: Pivot Tables and Charts
Once your Results Data sheet is complete, you can start playing with your data to better visualize your strategy performance. We’ve built two Pivot Tables & Charts default setups that look at the performance of each of your Nomenclature Strategies:
Test + Control Analysis tab
Test VS. Control Analysis tab
However, if you are familiar with these data tools, feel free to customize them to your taste.
Test + Control Analysis tab
You’ll find an aggregate analysis of CTR and Position % change average from both Control and Test pages together per strategy.

All Pages Results Chart
Test VS. Control Analysis tab
This tab shows a comparison of the CTR and Position % change average of the performance of each strategy between the Control pages (pages as is) and the Test pages (updated pages). The following pivot table will feed that chart analysis:

Test Pages Results Chart
Control Pages Results Chart
Making decisions
A large majority of the page's rankings decreased as a result of our tests - this is not a bad thing.
When done in a controlled environment it's easy to revert the changes. More importantly, it reinforces the importance of testing.
If you want to grow, you have to be willing to take risks and make changes.
